How to Fix a Leaky Faucet
Family Handyman
Updated on Oct. 03, 2024
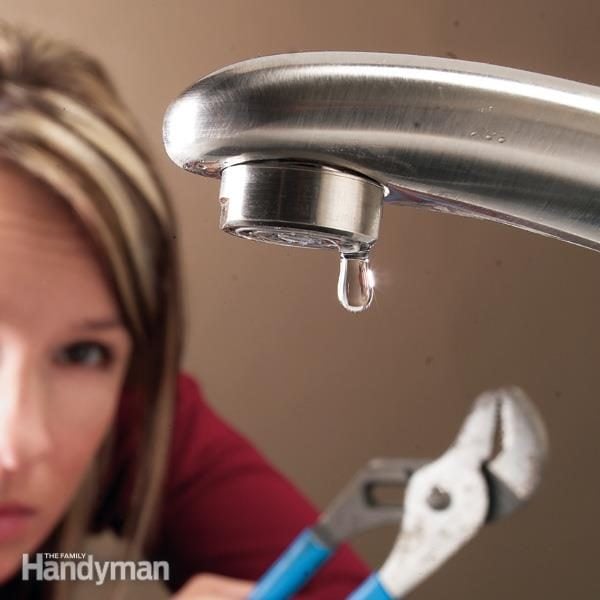
Fix a dripping kitchen faucet with replacement parts.
![]()
Time
An hour or less
![]()
Complexity
![]()
Cost
Introduction
You can fix almost any drippy single-lever kitchen faucet in about an hour. We’ll show you how. The repair is a lot easier than you might think, even for a plumbing novice.
Replacing kitchen faucet or repairing it yourself may seem daunting, but once you learn the basics, modern faucets are fairly easy to repair. In fact, the hardest step to fix a leaky faucet or a leaking sink sprayer is usually finding the right replacement parts. In this article, we’ll tell you how to find replacement parts and show you how to stop spout drips on the three main types of single-lever faucets: rotary ball, cartridge and ceramic disc. We’re showing kitchen faucets and kitchen faucet repair for a dripping faucet, but you can fix most single-lever bathroom faucets using the same procedures. We’ll also show you how to stop leaks around the base of the spout and fix leaking faucets.
The tools you’ll need for this how-to fix a leaky faucet project vary a little depending on the faucet you’re repairing. You’ll probably need an Allen wrench to remove the handle. Buy a set of small Allen wrenches and you’ll be prepared for all kinds of leaking faucets. Most repairs also require screwdrivers and a pair of large slip-joint pliers.
Editors Tip: Choosing the right faucet can be a task. Check these tips for choosing the right sink faucets!
Tools Required
- 4-in-1 screwdriver
- Allen wrench
- Pliers
- Slip joint pliers
Materials Required
- Faucet repair kit
- O-ring seals
Project step-by-step (18)
Replacing kitchen faucet or repairing it yourself may seem daunting, but once you learn the basics, modern faucets are fairly easy to repair. In fact, the hardest step to fix a leaky faucet or a leaking sink sprayer is usually finding the right replacement parts. In this article, we’ll tell you how to find replacement parts and show you how to stop spout drips on the three main types of single-lever faucets: rotary ball, cartridge and ceramic disc. We’re showing kitchen faucets and kitchen faucet repair for a dripping faucet, but you can fix most single-lever bathroom faucets using the same procedures. We’ll also show you how to stop leaks around the base of the spout and fix leaking faucets.
The tools you’ll need for this how-to fix a leaky faucet project vary a little depending on the faucet you’re repairing. You’ll probably need an Allen wrench to remove the handle. Buy a set of small Allen wrenches and you’ll be prepared for all kinds of leaking faucets. Most repairs also require screwdrivers and a pair of large slip-joint pliers.
Editors Tip: Choosing the right faucet can be a task. Check these tips for choosing the right sink faucets!
Rotary Ball Faucet Anatomy
- The diagram below shows the parts and assembly of a rotary ball faucet.
- Note: We recommend that you buy a repair kit that includes the ball, springs, seats and O-rings for the spout, as well as a small repair tool. With this kit, you’ll be prepared for almost any repair.

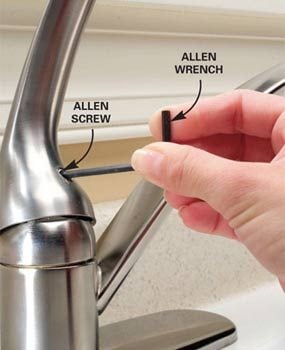
Loosen the Allen Screw
- Then turn off the water supply to the dripping faucet.
- Lift the handle and pry off the decorative cover to expose the Allen screw.
- Turn the screw counterclockwise until it’s loose enough to lift the handle up from the stem.
- Note: If water is leaking out around the base of the faucet handle, you may be able to fix the leak by removing the handle and simply tightening the adjusting ring slightly. Turn it clockwise with the spanner tool included in the repair kit. If the faucet drips from the end of the spout, replace the seats and springs.
Sign Up For Our Newsletter
Complete DIY projects like a pro! Sign up for our newsletter!
Do It Right, Do It Yourself!
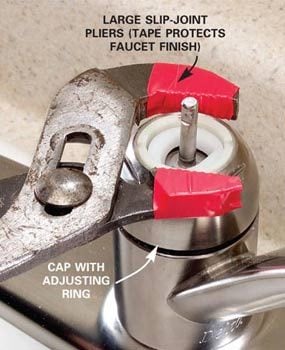
Remove the Cap
- Unscrew the cap by turning it counterclockwise with a slip-joint pliers.
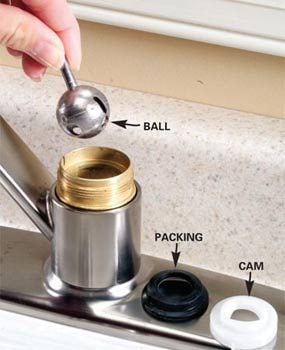
Remove the Rotary Ball
- Lift off the plastic cam and packing.
- Lift out the ball and inspect it.
- Replace the ball if it’s scratched, cracked or visibly worn.
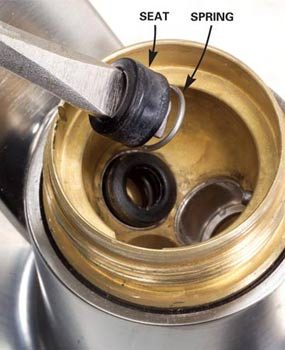
Remove and Replace the Seats and Springs
- Lift out the two rubber seats and springs with a screwdriver.
- Drop the new springs in the recesses and press the new rubber seats over the top with your fingertip.
- Align the groove in the ball with the pin in the socket and drop the ball in.
- Align the lug on the plastic cam with the notch in the valve body and set it over the ball.
- Thread on the cap with the adjusting ring and tighten it with the slip-joint pliers.
- Turn on the water to check for leaks.
- Pro tip: If water leaks from around the ball stem, use the spanner tool to tighten the adjusting ring until the leak stops.
Follow These Basics for All Faucet Repairs
Before you start, examine the dripping faucet closely to determine where the water is coming from. Leaks around the base of the spout require a different repair than a drip from the end of the spout.
Then turn off the water supply to the dripping faucet. You’ll probably find shutoff valves under the sink. If those valves don’t work or if you don’t have any, you’ll have to close the main water valve to your entire home. After you turn off the water, open the faucet in the center position to relieve water pressure and make sure the water is shut off. Finally, cover the sink drain holes with strainer baskets or rags to avoid losing small parts down the drain.
Pay close attention to the order and orientation of parts as you remove them. A digital camera or video camera is handy for recording each step in case you forget. For easier reassembly, set the parts aside in the order they were removed. When all the parts are out, inspect the interior of the valve for bits of deteriorated gaskets or mineral deposits. Use a cloth or fine nylon abrasive pad to clean the surface. Loosen mineral deposits by soaking them in vinegar.
Slow water flow can be caused by plugged holes in the faucet body. Use a small screwdriver or penknife to clean them out. Before you replace worn parts and reassemble the faucet, hold a rag over the dripping faucet and open the water shutoff valve slightly to flush out debris that may have been loosened during the cleaning and inspection.
After the faucet is reassembled, open the faucet to the middle position and gradually open the shutoff valves to turn on the water. Leave the faucet open until water flows freely and all the air is out of the pipes. If the water flow through the faucet is slow, the aerator may be plugged. Unscrew the aerator and clean it out.
Take the Old Parts to the Store to Find Replacements
You’ll often find the brand name stamped on the faucet. And this information will help when it comes time to find repair parts. But in most cases, the safest bet is to take the worn parts to the store with you.
If you have a Delta or other rotary ball faucet, you’re in luck because you’ll find repair kits in most hardware stores and home centers. Cartridges and repair kits for Moen “cartridge type” faucets are also readily available. But if you have another brand or a disc-type faucet, you may have to order parts, since there are too many variations for most stores to keep in stock. It helps to know the faucet’s model name or number when searching for a replacement cartridge. Otherwise, take the cartridge with you to the store so you can match it to a photo in the parts catalog.
Plumbing supply specialists are also a good source of repair parts. If you’re having trouble finding parts, call the manufacturer of your faucet for help.
Cartridge-Style Faucet Anatomy
- Cartridge-style faucet parts and assembly.
Author
